Wednesday, April 26, 2017

Converting MOV to Camtasia Studio For Editing Easily


Follow this guide to convert MOV to Camtasia Studio 9/8/7/6 editable WMV format for smooth editing.

MOV is a multimedia format that is used for saving and creating video files. It was developed by Apple for their Macintosh systems. MOV may contain video, audio, animation, graphics, virtual reality, 3D, and text information. This file format is easily manipulated with the right software installed. However, opening MOV files in Camtasia Studio can be frustrating from time to time for the complex video codec of MOV. 

"Your website says Camtasia Studio should be able to import/edit .mov files. The only type of file my Kodak video camera produces is .mov but Camtasia won't recognize those files when I try to import them and I get a 'No available codec' error."

In this article, you'll learn how to edit MOV videos in Camtasia Studio using three methods: uninstalling, renaming or converting MOV to Camtasia compatible video formats.


Method 1. Uninstall QuickTime correctly

With Apple's decision to no longer support updates to QuickTime on Windows the US government posted the following announcement advising users to uninstall the QuickTime software. To avoid the vulnerabilities in the announcement we do recommend uninstalling the QuickTime software.

Method 2. Rename MOV to MP4 and import again

If the .mov file is encoded in H.264 video and AAC audio that file can be imported and played without the use of QuickTime. If it doesn't import, simply change the extension of the file to .mp4 instead of .mov and try importing again. Any other type of .MOV files will not be able to be imported into Camtasia Studio.

Method 3. Convert MOV for importing to Camtasia Studio

Then what if you need to edit a .MOV that is not able to be imported into Camtasia Studio using the above methods? You'd better find an actual fix. As metioned, a .mov may use different codecs. It could be DNxHD, ProRes, DVCPRO, etc. So, you can't edit a MOV video directly in Camtasia Studio including the lastest Camtasia Studio 9.0.0.

An easy workaround is to change the file extentsion from "MOV" to "a codec" that Camtasia can read more easily (without rendering basically). The codec is H.264/MPEG-1, which ensures maximum editing quality and efficiency when working with Camtasia Studio. To convert MOV files to Camtasia, Dimo Video Converter Ultimate is an easy-to-use yet professional app to achieve your goal smoothly.

Unlike converting MOV with latest updated Handbrake 1.0.0, it is a free-to-try MOV converting application for Windows that features simple and user-friendly tools, functionalities for all your video needs and more video outputs. 

It is designed to assist you to convert all MP4MKV, FLV, SWF, MPEG-2, VOB, MXF, MPG, MOD, WEBM to Camtasia Studio with no efforts. It will ensure a perfect QuickTime file importing, playing and editing workflow with Camtasia Studio 9/8/7/6. For Mac users, just get Dimo Video Converter Ultimate for Mac to get th job done.

Free Download Dimo Video Converter Ultimate (Win/Mac):


Other Download: 
How to Convert MOV and Import MOV to Camtasia Studio 9/8/7/6

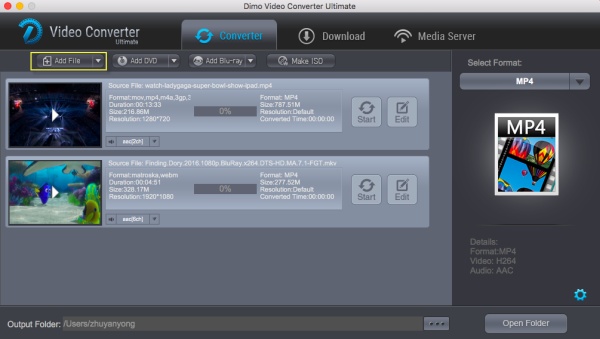
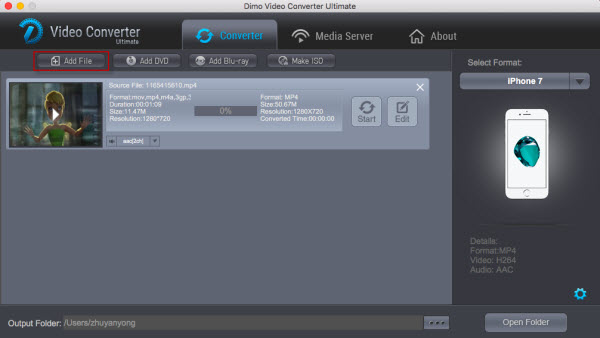
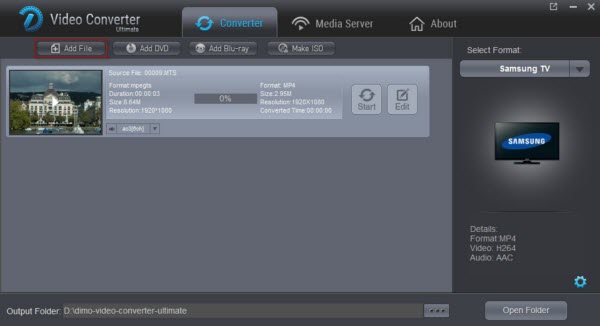
Step 1: Load MOV files to the program

Launch the MOV to Camtasia Studio Converter and click "Add file" button to locate the MOV file(s) you want to add.  


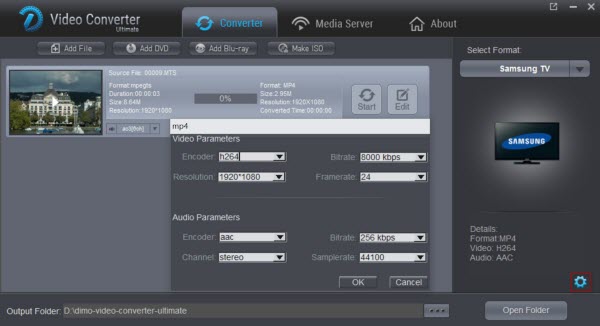
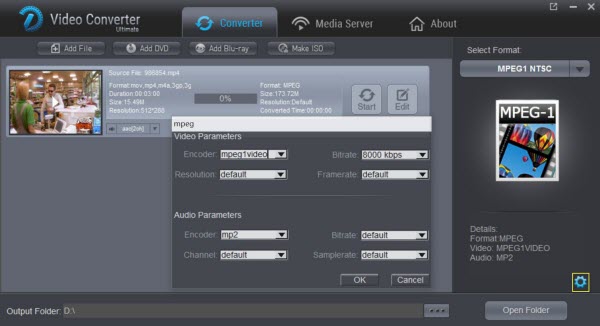
Step 2: Select output format

Click "Select Format" bar and then move your pointer to "Format" and turn to "HD Video" or "Video" and choose MPEG-1 or MOV as target format. Besides, you can also choose AVI, WMV, MP4, etc. if you want to get a relatively smaller output file.

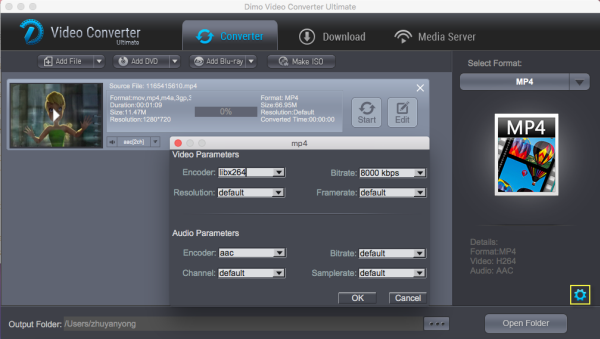
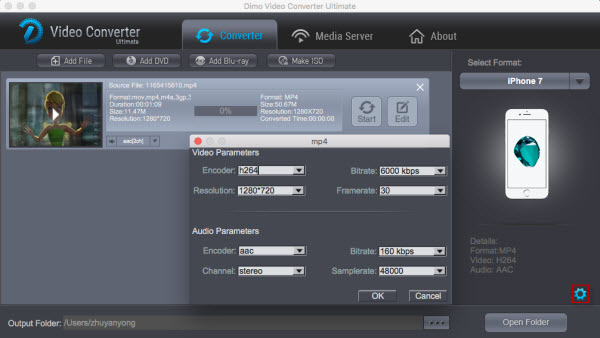
Step 3 (optional): Adjust the video, audio settings

Click "Settings" to fix the frame rate, bitrate, video size, etc to your needs. If you want to edit in Camtasia Studio without having to render the clips while editing, all the frame sizes must be the same as the sequence settings. You can save a lot of render time by making all the clips the same size with this MOV video converter.


Step4: Start MOV to Camtasia Studio conversion on Mac

Click the big "Start" button at the bottom right corner to finish transcoding MOV for Camtasia Studio. When the conversion is done, you can find the output files by clicking "Open" button on the main interface, then you can import the encoded files to Camtasia Studio 9/8/7/6 to open and edit with ease. Once you've got your video edited, you can export to any codec/container, even to MOV that you'd like for playing and sharing.

Free Download or Purchase Dimo Video Converter Ultimate:


Need the lifetime version to work on 2-4 PCs so that your friends and family can instantly broaden their entertainment options? Please refer to the family license here


Kindly Note:

The price of Dimo Video Converter Ultimate for Windows is divided into 1 Year Subscription, Lifetime/Family/Business License: $43.95/Year; $45.95/lifetime license; $95.95/family license(2-4 PCs); $189.95/business pack(5-8 PCs). Get your needed one at purchase page.

Related Software:

BDmate (Win/Mac)

Lossless backup Blu-ray to MKV with all audio and subtitle tracks; Rip Blu-ray to multi-track MP4; ConvertBlu-ray to almost all popular video/audio formats and devices; Copy Blu-ray to ISO/M2TS; Share digitized Blu-ray wirelessly.

DVDmate (Win/Mac)

A professional DVD ripping and editing tool with strong ability to remove DVD protection, transcode DVD to any video and audio format, and edit DVD to create personal movie.

Videomate (Win/Mac)

An all-around video converter software program that enables you to convert various video and audio files to formats that are supported by most multimedia devices.

8K Player (Win/Mac)

A mixture of free HD/4K video player, music player, Blu-ray/DVD player, video recorder and gif maker. 

Contact us or leave a message at Facebook if you have any issues.

Related Articles:

How to Convert Video to VR Format for Playing on PSVR


Do you want to convert ordinary videos to VR format for playback on your PSVR? Dimo Video Converter Ultimate can help you to do that.

Without doubt, 2016 is the year of VR (aka Virtual Reality). Movie studios like 20th Century Fox, Lionsgate, Disney, Marvel and Warner Bro. have already spent heavily to produce 360-degree VR movies. Some popular movies, such as Star Wars, The Hunger Games and The Martian, have been produced in VR mode and released online. Can't find your need VR videos or failed to play downladed VR videos on your immersive VR devices like PSVR? In this article, you are going to learn how to convert 2D/3D movie files to watch on PlayStation VR within a few clicks.


How to watch supported 2D/3D/VR videos on PS VR? 

Good News is that PS4 is updated with adding new update to the console's Media Player. If you have own PlayStatoin4 and a brand new, just launched PSVR headset, you are in good hands. You will be able to watch VR videos and enjoy an immersion with your favorite VR contents through the device.

Activating VR Mode to View 360 Content

Be sure to activate "VR Mode" from the Media Player's Option menu, and then select 360 clips of your choice from a connected server or USB device. Both video and still 360-degree content are supported, as long as they in MKV, AVI, MP4, MPEG2 PS, MPEG2 TS, AVCHD video formats, or JPEG, BMP, PNG image formats. However, each must be recorded in "equirectangular" format by a 360-degree camera in order for PS4 to recognize the file.

Steps to watch VR content on PSVR

1. Purchase and download your standard 360 VR porn movies in mono (equirectangular) MP4 format.
2. Upload the 360 VR videos in a separate folder onto a USB drive. You video files MUST be in a folder in order for PS4 system to recognize.
3. Insert the USB drive containing the VR videos into your PS4.
4. Launch the Media Player App.
5. Select VR Mode in Option (PS4 restart may be necessary).
6. Put on the headset and enjoy! The best 2D/3D movie maker for PSVR 

As you can see, the supported video file formats for  PS VR  (PS4 Media Player) are very limited. If you have some videos in PSVR incompatible formats, for example, FLV, M2TS, WebM, VOB, MXF, Tivo, etc. how can you play them on PSVR? Take it easy. All you need to do is to change video format using a 3D video converter.

Here Dimo Video Converter Ultimate is a  top-notch PSVR video converter software app that capable of speedily ripping any Blu-rays in 2D/3D, stardard DVD and convert 2D/3D movie files to any type of 3D you want (Anaglyph, Top-Bottom, Side-by-Side) for VR headsets including Playstation VR, HTC ViveGear VRVR OneGoogle Cardboard, etc. or 3D Players, 3D TV for watching amazing 3D movies. Besides, it also allows you to extract melodious soundtracks or special audios from 2D/3D movies for PlayStation VR audio experience with delivering high audio quality.

With the support for NVIDIA CUDA technology, video conversion will be finished in a flash. Its built-in powerful video editor makes it easy to cut, trim, split, join, crop, resize, rotate,  take video snapshots, add special effects/watermark. You are also allowed to adjust video/audio parameters, aspect ratio, resolution, frame rate, bit rate and more. The Mac version- Dimo Video Converter Ultimate for Mac is also to convert 2D/3D movies to PSVR on Mac (macOS Sierra included).

Free Download Dimo Video Converter Ultimate (Win/Mac):


Other Download: 
Steps to convert unsupported 2D/3D movies to PSVR

Step 1. Add Video Files 

Open this VR video converter for PSVR. You can directly use the "Add File" button to load the ordinary video that you wish to convert into PSVR format. Or it is also available to drag and drop video from PC folder into this program. Double click on the file and you can get a preview on the converter. 


Step 2. Select 3D SBS mode 

In order to make converted videos works perfectly with your PSVR, you need to set a video mode according to your video type. Click "Edit" and turn to "3D" tab and select Left/Right as the output video mode. Then you can turn to "Adjust" to crop and get the imported videos cropped as you want. If you encode the corrected aspect direct into your movie file you could plug your PS4 direct into the PlayStation VR for sbs 3D playback. 


Step 3. Select PSVR as Output Format 

Click the "Select Format" bar and you can choose "VR -> PSVR" as the target format. This format can be played well on PSVR. Also you can select "Format -> Video -> MP4" as output audio format for enjoying.

Step 4. Customize Video Settings 

Before starting the conversion, click the "Setting" icon on bottom right corner where you are able to adjust the video/audio settings like encoder, resolution, frame rate, bit rate and so on. Also it is possible to change output folder path as per your need by clicking "...".  


The newest kid on the block features a combined 1920 x 1080 display OLED resolution, with each eye seeing 960 x 1080. The screen also gets a 120Hz refresh rate and 100-degree field of view, which should translate to smooth visuals. Sony has also announced a 90Hz refresh rate option, for the PSVR, as well, which will allow developers to create games that aren't as hardware intensive.

Step 5. Start to Convert Normal 2D/3D video to PSVR

Click on "Start" button to accomplish the process of 2D/3D video to PSVR conversion. And this virtual reality video conversion will be finished in a short time. After the conversion, click the "Open" button to locate converted files, and then you can import the output .mp4 files into PlayStation VR for playing with the best quality including "look all around you" 3D vision and "hear things behind you" stereo sound.

Step 6. Watch converted SBS video on PSVR
  • Plug the PSVR HDMI cable directly to your PC(Mac), not the breakout box.
  • In the HDMI OUT port of the PSVR breakout box, You have to plug a HDMI cable to a TV that is turned on. Could be bypassed by connecting something like Headless Ghost, (this will trick the PSVR breakout box into thinking a display is connected to it.)
  • After that, you should see your PC screen on the PSVR headset, not in cinema mode but your entire screen covering the whole PSVR display, then you can use VLC or something to display a SBS 3D movie
Just make 3D movies for PSVR by yourself and leave the expensive 3D theater ticket away right now with faster conversion than ever before! The PlayStation VR connects to your PS4 via a special converter box. You plug the headset's HDMI and USB cables into the box, then the box into your PS4. A secondary HDMI port on the box lets you send the image to your TV, so you can wear the headset and still play your friend who doesn't have a headset of her own.  

Free Download or Purchase Dimo Video Converter Ultimate:


Need the lifetime version to work on 2-4 PCs so that your friends and family can instantly broaden their entertainment options? Please refer to the family license here


Kindly Note:

The price of Dimo Video Converter Ultimate for Windows is divided into 1 Year Subscription, Lifetime/Family/Business License: $43.95/Year; $45.95/lifetime license; $95.95/family license(2-4 PCs); $189.95/business pack(5-8 PCs). Get your needed one at purchase page.

Contact us or leave a message at Facebook if you have any issues.

Related Articles:

Monday, April 24, 2017

How to Play QuickTime MOV files on Philips TV from USB


In general, Philips TV doesn't support MOV(QuickTime) files from USB or DLNA devices. Fortunately, there is an easy way to fix the issue. Find it out here.

You can enjoy video, audio and image files on your Philips TV from USB or DLNA devices. However, when you try to play some QuickTime MOV format movies on Philips TV, you may find that some QT MOV files work just fine and some just don't seem to be playable on the Philips TV with an unhelpful audio codec error message displaying right on your screen. Does the Philips TV support QT MOV in USB format? Which format is the best Philips TV USB port format? Please read on.


Technically, MOV is a complex video container including different video encodings, only those MOV videos with encodings and resolution matching with the default encodings and resolution of Philips TV can be played. If the Philips TV does not recognize the codec, even if it is a supported format, you'll fail to play MOV. So if your MOV file does not support audio or video codecs certainly can not play smoothly on Philips TV. 

Luckily, there is an easy way to get of the incompatibility issues quickly. All you have to do is convert the MOV videos to a fully compatible format with Philips TV with a third-party tool. Once yo have, you can enjoy the QuickTime MOV files from a USB drive connected to the USB input on the TV or use the DLNA feature to access media files over your home network from other DLNA enabled devices, such as a PC or PlayStation system.

There are many programs available out there. If you are seeking for the best video output quality, fastest video conversion speed, and the most formats supported, Dimo Video Converter Ultimate for Mac is highly recommended and will be your best choice. With it, you don't need to know what is the audio or video codec in the MOV format that'll be best for your Philips TV. With it, you can do batch conversion transcode MOV, MKVAVI, VOB, TiVo, MP4 and more to Philips TV supported file formats with fast encoding speed and excellent output quality.

What's more, it offers kinds of preset profiles for media players including iPad, iPhone, Nexus, Nook, Samsung Galaxy Tab, Galaxy S7/S7 Edge, Surface, etc to meet your different needs. If you're using a Windows PC, simply turn to the Windows version, which has the same function with the Windows version. Here is how to do it.

Free Download Dimo Video Converter Ultimate for Mac/Win:


Other Download: 
How to Convert MOV files to play on Philips TV


1. Load MOV files to the converter

Launch this program, click the Add button or drag your MOV files directly onto the interface. Batch conversion is supported to ease your conversion and save time. You can check "Merge into one file" to join several video clips together if necessary.


2. Set Philips TV friendly format

Click the "Select Format" drop-down button to select Philips TV more compatible H.264 MP4 video from the "Format > Video" category.

Tip: To get a decent output video quality as you want, you can also click "Settings" icon to and enter "Profile Settings" panel to adjust video size, bit rate, frame rate, sample rate and audio channels.


3. Start conversion

Now you've come to the last step, just hit "Start" to start the MOV to Philips TV conversion.

Once it's finished, you can now connect the USB drive with computer and head to the destination folder where the converted files are stored, transfer the files to the USB drive then plug the drive in the Philips TV. It would be easy for you to play MOV on Philips TV with HD video quality.

Tip: If you prefer to watch videos on TV with the home DVD player like 8K Player for Mac hooked up, you can burn MOV files onto an ISO file with this TV Video Converter from Dimo too.  

Free Download or Purchase Dimo Video Converter Ultimate for Mac/Win:


Need the lifetime version to work on 2-4 Macs so that your friends and family can instantly broaden their entertainment options? Please refer to the family license here


Kindly Note:

The price of Dimo Video Converter Ultimate for Mac is divided into 1 Year Subscription, Lifetime/Family/Business License: $43.95/Year; $45.95/lifetime license; $95.95/family license(2-4 Macs); $189.95/business pack(5-8 Macs). Get your needed one at purchase page.

Related Software:

BDmate (Mac/Win)

Lossless backup Blu-ray to MKV with all audio and subtitle tracks; Rip Blu-ray to multi-track MP4; Convert Blu-ray to almost all popular video/audio formats and devices; Copy Blu-ray to ISO/M2TS; Share digitized Blu-ray wirelessly.

DVDmate (Mac/Win)

A professional DVD ripping and editing tool with strong ability to remove DVD protection, transcode DVD to any video and audio format, and edit DVD to create personal movie.

Videomate (Mac/Win)

An all-around video converter software program that enables you to convert various video and audio files to formats that are supported by most multimedia devices.

8K Player (Mac/Win)

A mixture of free HD/4K video player, music player, Blu-ray/DVD player, video recorder and gif maker. 

Contact us or leave a message at Facebook if you have any issues.

Related Articles:

Playing, Editing DJI OSMO 4K on iPhone


Trying to use your iPhone to play the 4K videos from DJI OSMO, but having trouble with video format? Don't worry. Get the quick fix from this page.

A Zenmuse X3 three-axis gimbal with a camera is an important part for DJI OSMO. This fan-cooled gimbal-camera can record videos of up to 4K resolution - 4,096 x 2,160 at 24fps or 3,840 x 2,160 at 30fps/24fps, to be exact - with a maximum video bitrate of 60 Mbps. If you recorded some 4K videos by DJI OSMO, you may like playing the 4K footage with iPhone. So, here offers the DJI OSMO 4K to iPhone best workflow for you.


In fact, the large file size from DJI OSMO is not supported well by iPhone (It supports H.264 video up to 4K, 30 frames per second, High Profile level 4.2 with AAC-LC audio up to 160 Kbps, 48kHz, stereo audio in .m4v, .mp4, and .mov file formats). To play DJI OSMO 4K on iPhone smoothly, a good suggestion is to downscale the file size by lowering the bitrate from 60Mbps to 160 Kbps.

To achieve the goal effortlessly, download and install Dimo Video Converter Ultimate for Mac. Overall, the best 4K Video Converter for Mac just can meet your needs. With it, you can fast convert DJI OSMO 4K videos to iPhone compatible format like MP4, MOV, M4V on Mac (OS 10.12 included) and PC (Windows 10/8/7) without quality loss. 

What's more, with the built-in video editor, it's freely for you to trim the 4K videos into multiple segments with short duration. The most important is that, it allows you to modify the video bitrate, frame rate, video size, audio channel, etc for your original 4K clips for easier uploading. If you're using a Windows PC, simply turn to Dimo Video Converter Ultimate to convert and transfer OSMO 4K to iPhone on Windows computer.

Free Download Dimo Video Converter Ultimate for Mac/Win:


Other Download: 
How to Compress/Transcode DJI OSMO 4K for Playing on iPhone? 

Step 1. Launch the 4K Video Converter. Click the button "Add File" to add JI OSMO 4K videos (or directly drag and drop your files) to the Converter. 

Tips: When the DJI OSMO 4K videos are loaded to Dimo Video Converter Ultimate, you can view the videos from the Preview window by double clicking. Simply click the "Edit" button and when the video is playing, you are allowed to take snapshoot. 


Step 2. From "Select Format" bar drop-down list, choose the formats that you want to output for later use. For compatibility consideration, it is idea for you to choose iPhone 7, iPhone 7 Plus, iPhone SE, iPhone 6S, iPhone 6S Plus, etc. from "Device > Apple" as output file format. 

Tip 1: If your iPhone has limited storage space, then your reset the video resolution, frame rate, biterate and more of your 4K videos getting from DJI OSMO by clicking settings gear icon, because the default resolution of "iPhone 7/7 Plus/6/6S" is 1080p, you could shrink your 4K videos to 1080p/720p without downgrading your watching experience. And as we know bitrate of iPhone 7/7 Plus/SE/6S is 30Mbps and they doesn't work with 60fps 4k video well. Thus you can set the video frame rate like 24fps. If you don't want to spend long time to copy the converted 4K video to iPhone.


Tip 2: If the 4K video clips you've recorded are still longer than your requirements, but you won't like to give up the quality to 480p or others, then you could activate the build-in video editor in this 4K viceo converter by click "Edit", so that you can choose to trim and split the 4K movie into smaller parts so as to play on iPhone with zero quality. Click the "Trim" icon in the main interface, and you can cut your files according to time length and file size.

Step 3. Finally, simply hit the "Start" button to start converting DJI OSMO 4K to iPhone. Within several minutes, you can find the converted file on your computer by clicking the "Open" button. And then you can transfer the converted OSMO 4K files to iPhone 7/7 Plus, iPhone SE, iPhone 6S, iPhone 6S Plus, etc. for playing via iTunes smoothly. 

Or keep your computer and target iPhone at the same network, Dimo Media Server will make full use of IP address sharing technology, so that you can remotely share and enjoy all converted videos to not only iPhone, but also iPad Mini 4/3, Samsung Galaxy Note 5/S7/S7 Edge, Galaxy Tab S2, Samsung TV, etc. Better still, you can make ISO for backup from your recorded 4K videos from DJI OSMO.

Free Download or Purchase Dimo Video Converter Ultimate for Mac/Win:


Need the lifetime version to work on 2-4 Macs so that your friends and family can instantly broaden their entertainment options? Please refer to the family license here


Kindly Note:

The price of Dimo Video Converter Ultimate for Mac is divided into 1 Year Subscription, Lifetime/Family/Business License: $43.95/Year; $45.95/lifetime license; $95.95/family license(2-4 Macs); $189.95/business pack(5-8 Macs). Get your needed one at purchase page.


Related Software:

BDmate (Mac/Win)

Lossless backup Blu-ray to MKV with all audio and subtitle tracks; Rip Blu-ray to multi-track MP4; Convert Blu-ray to almost all popular video/audio formats and devices; Copy Blu-ray to ISO/M2TS; Share digitized Blu-ray wirelessly.

DVDmate (Mac/Win)

A professional DVD ripping and editing tool with strong ability to remove DVD protection, transcode DVD to any video and audio format, and edit DVD to create personal movie.

Videomate (Mac/Win)

An all-around video converter software program that enables you to convert various video and audio files to formats that are supported by most multimedia devices.

8K Player (Mac/Win)

A mixture of free HD/4K video player, music player, Blu-ray/DVD player, video recorder and gif maker. 


Contact us or leave a message at Facebook if you have any issues.

Related Articles:

Monday, April 17, 2017

Watch AVI on Samsung TV via USB


The easy workaround to watch AVI on Samsung TV is to encode AVI to Samsung TV playable format via USB. Simply follow this article to learn how.

Q:My Samsung TV plug in U disk to watch movies! The The format of the film is RMVB I converted the AVI format how can not see the TV is to support AVI?
Wrong answer:The. Rmvb suffix name changed to .avi or .ts and other instructions on the support of the format, you can play. Sometimes prompted "does not support the audio format", you need to play the original MKV video
Good answer:Use the video converter to convert the video to a TV format supported by Samsung TV
If you are a professional user and are familiar with ffmpeg, you can use the command line to convert, but in reality, too much trouble, the best situation is to find some ripper to complete your job.

Q:Some avi movies why on the Samsung TV can not play?
A:AVI format includes several encoding types, and your player may not support certain encoding types. In this case, you can use DIMO VIDEO CONVERTER to convert these videos, it native support for output Samsung TV video format

Samsung as a very great company in Korea, more and more intelligent devices everywhere, today plays an important role in Samsung's huge product line, from smart chips to smart phones, smart TVs, giving users a good impression, But personally, I like China's XIAOMI a little more.
But it is undeniable that Samsung's equipment is beautiful, user-friendly, worth trying.

Can Samsung TV be able to play the AVI files? You have probably tried this at some time. But strangely, some AVI files work and some just don't seem to be playable on the Samsung TV. Your guesses are right! It's refusing to play an AVI file because of the unsupported audio codec in the video file. Find the reason and the easiest solution to fix the "Fail to play AVI on Samsung TV" issue in this article. 


For your information, an AVI is only a container. Different AVI files tends to contain different video and audio codecs. Samsung TV only plays AVI encoded with Divx 3.11/4.x/5.x/6.1, XviD, H.264 BP/MP/HP, MPEG-4 SP/ASP, Motion JPEG. If your AVI files are encoded with other codec, Samsung TV will not play. And it's hard to find the right codecs and install them accordingly. Frankly, there is a smarter way to get rid of the incompatibility issues quickly - encode AVI to Samsung TV friendly format.

To finish the task,  finding a third-party tool to make everything easy. If you are seeking for the best video output quality, fastest video conversion speed, and the most formats supported, Dimo Video Converter Ultimate will be your best choice. It's a professional yet easy-to-use app which can help us convert AVI to Samsung TV accepted AVI videos without any quality loss. 

In addition, it not only supports AVI videos, but also handles various common video formats, like MXF. MTS, MOVFLVMKVMP4, WMV .etc. What's more, it offers kinds of preset profiles for media players including iPad, iPhone, PS4 Pro, Xbox One S, Gear VR, Oculus Rift, HTC Vive, etc to meet your different needs.

If you're using a Mac, simply turn to the Mac version, which has the same function with the Windows version. After download, you just have this great Sony TV video converter installed on your computer. Then, follow the guide below to play AVI on Samsung TV smoothly.

Free Download Dimo Video Converter Ultimate (Win/Mac):


Other Download: 
Encoding AVI to Samsung TV more compatible format

Step 1: Start the AVI to Samsung TV converter and drag .avi files to the software interface to import the file. 


Step 2: Set output video format as Samsung TV supported H.264 MP4. Choose "Samsung TV" under "Select Format > TV". The default setting will work great for your Samsung TV.

Tip:Before start the AVI conversion for Samsung Smart TV, you can click the Settings icon and adjust the video bitrate, codec, frame rate, audio sample rate, etc parameters.


Step 3: Hit the "Start" button; this video converter will start to convert AVI for playback on Samsung TV through USB drive or DLNA in no time. 

After the conversion is over, connect the USB drive with computer and head to the destination folder where the converted files are stored, transfer the files to the USB drive then plug the drive in the Samsung TV. Or wireless share to TV via Dimo free Media Server. Enjoy!

Free Download or Purchase Dimo Video Converter Ultimate:


Need the lifetime version to work on 2-4 PCs so that your friends and family can instantly broaden their entertainment options? Please refer to the family license here


Kindly Note:

The price of Dimo Video Converter Ultimate for Windows is divided into 1 Year Subscription, Lifetime/Family/Business License: $43.95/Year; $45.95/lifetime license; $95.95/family license(2-4 PCs); $189.95/business pack(5-8 PCs). Get your needed one at purchase page.

Related Software:

BDmate (Win/Mac)

Lossless backup Blu-ray to MKV with all audio and subtitle tracks; Rip Blu-ray to multi-track MP4; ConvertBlu-ray to almost all popular video/audio formats and devices; Copy Blu-ray to ISO/M2TS; Share digitized Blu-ray wirelessly.

DVDmate (Win/Mac)

A professional DVD ripping and editing tool with strong ability to remove DVD protection, transcode DVD to any video and audio format, and edit DVD to create personal movie.

Videomate (Win/Mac)

An all-around video converter software program that enables you to convert various video and audio files to formats that are supported by most multimedia devices.

8K Player (Win/Mac)

A mixture of free HD/4K video player, music player, Blu-ray/DVD player, video recorder and gif maker. 

Contact us or leave a message at Facebook if you have any issues.

Related Articles: