Monday, May 8, 2017

Best Blu-ray Main Movie to M2TS Backup Solution

Rogue One: A Star Wars Story is finally out on Blu-ray and the movie itself is fantastic. If you're a fan of Rogue One, this is something you gotta follow. That's how to copy your main Blu-ray Movie to m2ts for saving on hard drive in case of damage or theft. In this page, we will give you the solution to directly copying main movie from a Blu-ray disc into m2ts without extras to take up space. 


Requirement: Dimo Video Converter Ultimate for Mac, which is all-in-one Blu-ray ripping and Blu-ray backup software. 

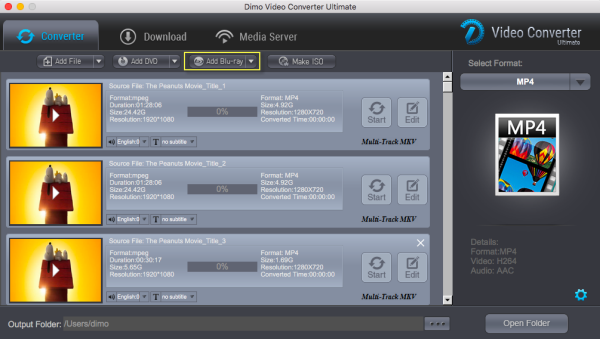
It is an easy-to-use program, which just needs several clicks to complete Blu-ray main movie copying on Mac (OS Sierra included). With it, you can copy the latest commercial Blu-ray to hard drive with only containing the main feature (movie) of the DVD, and leave out unwanted menus or other extras. Besides, applying the Blu-ray ripping software, all commercial protected Blu-ray movies can be ripped to nearly all popular video and audio formats like MP4, MOV, MKV (lossless mkv included), WMV, AAC, MP3 as you need for playback on different media devices. Even copying Blu-ray to ISO for saving on HDD is allowed.

If you are on Windows PC (Windows 10 included), Dimo Video Converter Ultimate is right for you. Download the right version and follow the step-by-step tutorial. (P.S: If you wanna make a Blu-ray backup keeping exactly the original file structure without anything changed, please turn to how to 1:1 make Blu-ray full disc copy

Free Download Dimo Video Converter Ultimate for Mac/Win:


Other Download: 

How to Copy Rogue One Blu-ray Main Movie to M2TS without extras

Step 1: Select Rogue One Blu-ray source.

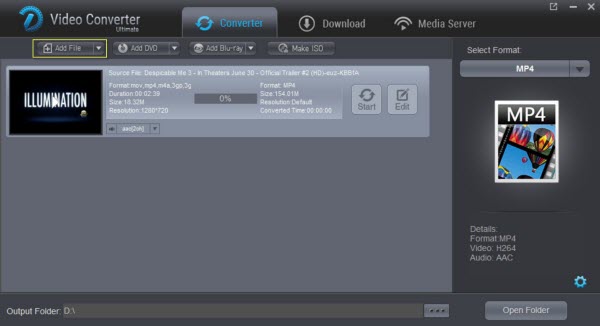
When launch the best Blu-ray to M2TS backup software, click "Add Blu-ray" button to load your inserted Blu-ray disc or Blu-ray folder. Once imported, you will get a list of titles on the source.


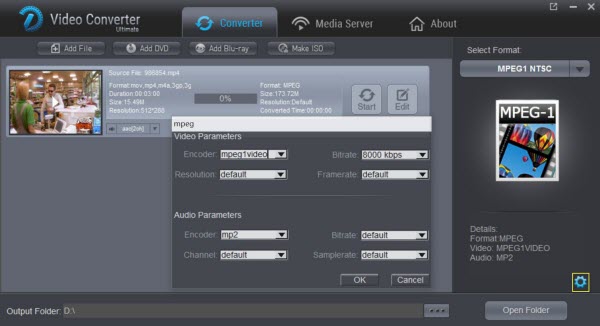
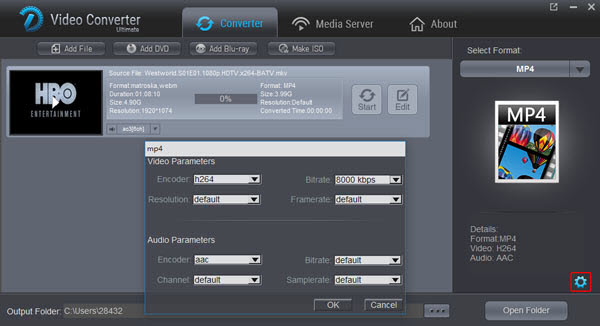
Step 2: Click Directly Copy and set output folder

Firstly, go to select the location of output files. Simply click "..." button and choose the destination folder. Secondly, click "Direct Copy" and it will copy the intact main movie without any recoding and you will get a lossless m2ts file at amazing conversion speed.


Step 3: Lossless Backup Rogue One Blu-ray main movie to M2TS

Now it is time to start backing up Blu-ray to M2TS without encoding by clicking "Start" button. When the copying work is done, you are able to click "Open" button to get the output .m2ts files without any other extra contents. As the generated M2TS file is intact backup of Rogue One Blu-ray main movie, so it will retain all the multiple audio and subtitle tracks. You can play M2TS with 8K Player for Mac?or VLC, and you can also compress the M2TS to a smaller-size file and transcode to a more efficient format like MP4, MOV, AVI with Dimo Video Converter Ultimate for Mac. 

Free Download or Purchase Dimo Video Converter Ultimate for Mac/Win:


Need the lifetime version to work on 2-4 Macs so that your friends and family can instantly broaden their entertainment options? Please refer to the family license here


Kindly Note:

The price of Dimo Video Converter Ultimate for Mac is divided into 1 Year Subscription, Lifetime/Family/Business License: $43.95/Year; $45.95/lifetime license; $95.95/family license(2-4 Macs); $189.95/business pack(5-8 Macs). Get your needed one at purchase page.

Related Software:

BDmate (Mac/Win)

Lossless backup Blu-ray to MKV with all audio and subtitle tracks; Rip Blu-ray to multi-track MP4; Convert Blu-ray to almost all popular video/audio formats and devices; Copy Blu-ray to ISO/M2TS; Share digitized Blu-ray wirelessly.

DVDmate (Mac/Win)

A professional DVD ripping and editing tool with strong ability to remove DVD protection, transcode DVD to any video and audio format, and edit DVD to create personal movie.

Videomate (Mac/Win)

An all-around video converter software program that enables you to convert various video and audio files to formats that are supported by most multimedia devices.

8K Player (Mac/Win)

A mixture of free HD/4K video player, music player, Blu-ray/DVD player, video recorder and gif maker. 

Contact us or leave a message at Facebook if you have any issues.

Related Articles:

Wednesday, May 3, 2017

Tricks Importing MP4 to PlayStation 4 Smoothly

Although the official site has announced Sony PlayStation 4 can support MP4 files, you still find some MP4 files fail to play on the device. That's because it only supports an MP4 file with the video codec of MPEG-4 AVC H.264 and MPEG-4. However, different MP4 files tends to have different video codecs and the codecs which might not be compatible with the console. To play those incompatible MP4 files on PS4, the easy solution is to convert MP4 to PS4's supported formats, and then transfer the converted files via USB.


To finish the task, you can adopt Dimo Video Converter Ultimate. It can help you convert MP4 into the supported formats of PS4. Other format videos like MKV, VOB, FLV, MOV, F4V, MXF, AVCHD, MTS, ASF, etc. can also be converted with Dimo.

Get the Best MP4 to PS4 Video Converter:

* Fast Conversion with best quality: Flawless conversion of media files with best quality standards within seconds.

*  Library of Presets: Flexible & category-wise profiles allows you to switch media files from one file format into another with more than 150 presets including PS4 Pro, PS4, PS3, Xbox 360, Xbox One, Xbox One S.

* Offers Core Editing TOOLS: It is equipped with advanced video editing function like extracting audio, cropping video, splitting video, trimming, adjust effects, add watermarks/effects, change bit rate or frame rate etc.

*  Export local movies via wifi: One-click to share Videos from computer to iPhone, iPad, Android, TV, etc wirelessly.

* Make ISO files: Turn video folder or Blu-ray to ISO files for backup or playing freely

*  Compatible Windows 10/8.1/8/7/XP/Vista, as well as macOS 10.12 Sierra, 10.11 El Capitan, 10.10 Yosemite, 10.9 Mavericks, 10.8 Mountain Lion and 10.7 Lion, etc.

For Mac users, Dimo Video Converter Ultimate Mac is also a helpful app to encode MP4 videos to PS4 on Mac for further usage. Just get the right version according to your computer's OS and follow the step-by-step guide below to convert MP4 files to PS4 smoothly.


Free Download Dimo Video Converter Ultimate (Win/Mac):


Other Download: 
How to convert and stream MP4 to PS4

Step 1. Load MP4 files

First, run this smart MP4 to PS4 video converter and then import your local MP4 files by either clicking "Add file" button in the top-left corner of the interface or drag-and-drop the MP4 files you want from your local directory. It's illustrated in the screenshot below.


Step 2. Select output format

Now click the "Select Format" icon to reveal output panel, then move mouse cursor to "Device > Game" category to Select PS4 as the output format. PS4 won't play MP4 sometimes or there is only video or audio when people play MP4 files in PS4. Why? That's because PS4 only supports this kind of MP4:

- Visual: H.264/MPEG-4 AVC High Profile Level4.2
- Audio: AAC LC, AC-3 (Dolby Digital)

Tip: By clicking the Settings icon, you can adjust video and audio parameters like codec, bit rate, frame rate, sample rate, etc., in that way, you can take charge of the size and quality of the output files. In principle, the larger input values, the better output quality, but the corresponding larger file size.


Step 3. Start converting MP4 to PS4

At this point, you can change the output filename or output path if you wish. If you feel satisfied with your options, Just hit the "Start" button to activate MP4 file to PS4 conversion. When all conversions completed, you'll get a pop-up notice. Just click "Open", you can fast find where your converted files are saved. Now you can transfer incompatible MP4 files on PS4 via streaming or the help of a USB storage and enjoy them without any hassles.

How to Transfer videos to PS4 Via USB

First, insert a USB drive into your computer, copy the converted MP4 onto it.

Second, insert the USB drive into USB port of PS4, then go to the main menu, select "Video" and find your USB Drive, select "Display All" to show the video files on the USB drive. Please choose the file that you want to transfer and press the triangle button, choose "Copy" and confirm, the movie will be transferred to your PS4 hard drive, then you can play it.

P.S.

Sony PS4 is equipped with 4K resolution, eight-core X86 AMD Jaguar CPU, 8GB of GDDR5 memory, built-in 500GB hard disk drive, read only Blu-ray drive and even video streaming function, you can get better enjoyment with the improvement of hardware.

Though the truth that the PS4 will not be able to play 4K Blu-ray movies which may disappoint you, you can still take advantage of Video Converter Ultimate to convert videos and movies you like to play on PS4.

Other possible solutions for PS4 MP4 Playback issues:

1. Make sure your USB storage devices are in FAT and exFAT formats. PS4 doesn't recognize NTFS which means you can't play videos larger than 4GB. So reduce video size or split videos if need be, meanwhile, you have to convert NTFS to FAT32 or exFAT.

2. Create a folder and place all your videos into it when using a USB storage device so that your PS4 system can recognize and read them, otherwise you won't see anything. No specific folder name required for videos, but audio needs to be in a folder named "Music".

Free Download or Purchase Dimo Video Converter Ultimate:


Need the lifetime version to work on 2-4 PCs so that your friends and family can instantly broaden their entertainment options? Please refer to the family license here


Kindly Note:

The price of Dimo Video Converter Ultimate for Windows is divided into 1 Year Subscription, Lifetime/Family/Business License: $43.95/Year; $45.95/lifetime license; $95.95/family license(2-4 PCs); $189.95/business pack(5-8 PCs). Get your needed one at purchase page.

Related Software:

BDmate (Win/Mac)

Lossless backup Blu-ray to MKV with all audio and subtitle tracks; Rip Blu-ray to multi-track MP4; ConvertBlu-ray to almost all popular video/audio formats and devices; Copy Blu-ray to ISO/M2TS; Share digitized Blu-ray wirelessly.

DVDmate (Win/Mac)

A professional DVD ripping and editing tool with strong ability to remove DVD protection, transcode DVD to any video and audio format, and edit DVD to create personal movie.

Videomate (Win/Mac)

An all-around video converter software program that enables you to convert various video and audio files to formats that are supported by most multimedia devices.

8K Player (Win/Mac)

A mixture of free HD/4K video player, music player, Blu-ray/DVD player, video recorder and gif maker. 

Related Articles:

Tricks Importing MKV to Camtasia Studio 9/8 Smoothly

Camtasia Studio is professional screen recording and video editing software on Windows/Mac computer. It can merge, split, trim, crop, edit and create videos to share with others. Even though Camtasia Studio has been upgraded to 9.0.0 two months ago, users still fail to import videos to Camtasia Studio like MKV which are downloaded from Internet, because of MKV incompatibility with Camtasia. So how can you make .mkv files editable in Camtasia Studio (9, 8)?


How to get MKV Videos Imported by Camtasia Studio?

According to Techsmith support website, Camtasia Studio supports AVI, .WMV, MPEG-1, .MP3, .WAV, .WMA, MP4, MTS/M2TS and .MOV (QuickTime) files. In order to import MKV files to Camtasia Studio, it is necessary to ask how to convert MKV to formats like MOV, MPEG-1, etc. which are supported by Camtasia. Along with some help from third-party video converter software, it can be done effortlessly. 

To do that, you can use Dimo Video Converter Ultimate, this software can deal with almost all kinds of MKV videos. With it, users can effortlessly transcode (SD/HD/4K, H.264/H.265, 2D/3D) MKV files for smoothly editing in Camtasia Studio. What's more, it can generates more optimal editing formats/codecs for you to use in different NLE apps, such as Adobe Premiere Pro, Sony Vegas, Avid Media Composer, Windows Movie Maker and more. 

For Mac users, please get Dimo Video Converter Ultimate for Mac. If you're interested in doing likewise, check out the guide below to transcode MKV files to Camtasia Studio natively supported formats so that you can make engaging movies with your MKV clips.

Free Download Dimo Video Converter Ultimate (Win/Mac):


Other Download: 
[Quick workaround] Transcode MKV to Camtasia Studio 9/8 Friendly Format  

1. Add MKV files

Run the MKV converter for Camtasia and click "Add file" button to import the MKV files. As you can see, you can also drag and drop the media to the program's main interface.


2. Choose output format

Click "Select Format" bar and choose "MPEG-1" or "QuickTime MOV" from "Format > Video", which can be recognized by Camtasia. 

The following formats are able to be imported into Camtasia Studio for editing & production:

AVI, WMV, MPEG-1

MOV (QuickTime for Windows must be installed for MOV import.)   

MTS and M2TS files. (Version 8.4 and later)  You will need the AC-3 Filter if running Windows 7 or Winodws 8.0.  

MP4 (AVC/h.264 at no more than 30 frames per second)

MP3,WAV,WMA 

Tips: 

a. Click the Settings icon to adjust video and audio parameters on the Profile Setting as you need to get the best quality video since Camtasia Studio 9, 8 is optimized for high definition video editing.  


b. To make a highlight video out of downloaded MKV before converting, you can do some trimmings first:

To start with, click the “Edit” button. In the new video editor, find the “trim” tab, in the timeline, set the start time point and the end time point in the "start" and "end" boxes. And, finally click the “OK” button to finish editing. You can also change your new clip length by clicking “Delete” button. Also you are able to merge many separate trimmed segments into one.

3: Starting converting MKV files

Simply click the "Start" button to start converting MKV to Camtasia Studio and everything else will be automated. If you have added quite a bunch of video files, it would take some time to convert. You're done. Now your MKV files will be converted into MPEG-1/MOV files ready to be imported to Camtasia Studio beautifully. Then customize and edit into your own video for sharing with your clients, your students or your friends. 

In addition to convert videos like MKV, MXF, MP4, MOV, etc. to Camtasia, Dimo Video Converter Ultimate can also encode Camtasia Studio recorded videos to play and share anywhere you like or even export to MKV as well. Have a try!

Free Download or Purchase Dimo Video Converter Ultimate:


Need the lifetime version to work on 2-4 PCs so that your friends and family can instantly broaden their entertainment options? Please refer to the family license here


Kindly Note:

The price of Dimo Video Converter Ultimate for Windows is divided into 1 Year Subscription, Lifetime/Family/Business License: $43.95/Year; $45.95/lifetime license; $95.95/family license(2-4 PCs); $189.95/business pack(5-8 PCs). Get your needed one at purchase page.

Related Software:

BDmate (Win/Mac)

Lossless backup Blu-ray to MKV with all audio and subtitle tracks; Rip Blu-ray to multi-track MP4; ConvertBlu-ray to almost all popular video/audio formats and devices; Copy Blu-ray to ISO/M2TS; Share digitized Blu-ray wirelessly.

DVDmate (Win/Mac)

A professional DVD ripping and editing tool with strong ability to remove DVD protection, transcode DVD to any video and audio format, and edit DVD to create personal movie.

Videomate (Win/Mac)

An all-around video converter software program that enables you to convert various video and audio files to formats that are supported by most multimedia devices.

8K Player (Win/Mac)

A mixture of free HD/4K video player, music player, Blu-ray/DVD player, video recorder and gif maker. 

Contact us or leave a message at Facebook if you have any issues.

Related Articles:

Monday, May 1, 2017

Can I Play QuickTime MOV on Windows Media Player


Windows Media Player has various multimedia functions; it can be used to play movies, documentaries, audio-video clips etc. In some cases, MOV files are not recognized in Windows Media Player. One of the main reasons that MOV files may fail to play is due to technical issues. That may occur when the user does not have the plug-ins needed to play the MOV videos. Another problem could be with the QuickTime MOV codec. Installing a QuickTime player could solve the codec problem. However, the QuickTime player is big-sized, and it will install junks to your computer. In this article, we aim to work out the fastest solution to help you play QuickTime with Windows Media Player smoothly.


Actually, it's not as difficult as you imagine. What you need is a just a common video converter like Dimo Video Converter Ultimate to help you watch MOV on Windows Media Player without any hassle. And you could get wonderful output files and never worry about out of audio/video sync. More than that, it also provides an access to touch up QuickTime MOV videos, which including trimming, cropping, appending artistic effects and more. If you are Mac users, please turn to Dimo Video Converter Ultimate for Mac (El Capitan, macOS Sierra included). The guide below will teach you how to convert and import MOV to Windows Movie Maker so you can make engaging movies with MOV, MP4, WMV and other video files.

Free Download Dimo Video Converter Ultimate (Win/Mac):


Other Download: 

How to convert QuickTime MOV to Windows Media Player?

Step 1. Add QuickTime MOV video

Start up the QuickTime MOV to Windows Media Player converter, and then click "Add File" to import all QuickTime MOV files.

Step 2. Choose output compatible format with Windows Media Player

Click the "Select Format" menu, select Windows Media Player friendly format as your output video format. There, you can take WMV as your output video format. If you prefer high definition videos, move your mouse pointer to "HD Video" and then choose HD WMV. To get the more compressive file, "MP4" and "HD MP4" can be your better choice.


Tips: The smart MOV file converter additionally offers some useful edit functions to enhance your video. Click the "Edit" button to explore more features with Dimo Video Converter Ultimate.

STEP 3. Start converting QuickTime MOV to Windows Media Player

Click "Start" button to enable QuickTime MOV to WMV/MP4 conversion for playing with Windows Media Player. The conversion process will take a while, and you'll see an encoding progress bar.

Once finished, click the "Open" button in the main interface and you can locate the encoded MOV files effortlessly. And then you are able to use these files in Windows Media Player as you want.
Free Download or Purchase Dimo Video Converter Ultimate:


Need the lifetime version to work on 2-4 PCs so that your friends and family can instantly broaden their entertainment options? Please refer to the family license here


Kindly Note:

The price of Dimo Video Converter Ultimate for Windows is divided into 1 Year Subscription, Lifetime/Family/Business License: $43.95/Year; $45.95/lifetime license; $95.95/family license(2-4 PCs); $189.95/business pack(5-8 PCs). Get your needed one at purchase page.

Contact us or leave a message at Facebook if you have any trouble to convert QuickTime MOV for importing to Windows Media Player as you want.

Related Articles:

View/Play MKV clips on Oculus Cinema in 3D SBS MP4

Oculus's cinema app could be one of the most compelling parts of virtual reality. If you have some MKV movie files downloaded from torrent sites, chances are you want to play MKV files on Oculus Cinema. When you try to do this, the VR display may play some MKV files with no sound issue. So, what's the matter? 


Actually, MKV files in 2D or 3D SBS (Side-by-Side) work on Oculus Cinema, but the audio has to be encoded in AAC or MP3 for stereo. AC3 audio and DTS Dolby don't seem to work. In this case, the easy and quick solution is to convert MKV files to Oculus Cinema more compatible format to get them to play nicely. In this article, you'll learn how to view MKV files on Oculus Cinema with the audios preserved nicely.

In fact, it's a easy job. In order to watch MKV movies on Oculus Cinema in perfect sound and 3D effect, you just need a right program and convert MKV to .mp4, .m4v, .3gp, .3g2, .ts, .webm, .mkv, .wmv, .asf, .avi, .flv, etc. for smoothly playing with Oculus Cinema without MKV codec installed. Then which app can help you do the conversion work fast? At this time, the third party program called Dimo Video Converter Ultimate has been proven to be an outstanding 3D video converter.

This program features high efficiency and seamless conversion. With it, you can do fast conversion from MTS,  MKVFLV, AVI, MP4, MOV, etc. video files and DVD/Blu-ray discs to a fully compatible video formats with Oculus Cinema without quality loss. This software allows you to convert MKV to 3D videos such as MKV Top-bottom 3D Video, MP4 Top-bottom 3D Video, MP4 Side-by-Side 3D video, which can be played on Oculus Cinema perfectly. 

What's more, with the built-in editor, you can trim, crop, adjust special effect to your YouTube video, so that you get the very part and effects at your will. If you are a Mac user, you can turn to Dimo Video Converter Ultimate for Mac (macos Sierra included), which has the same function as the Windows version. Just download, install and launch this great Oculus Cinema video converter and then follow the tutorial to finish the task.

Free Download Dimo Video Converter Ultimate (Win/Mac):


Other Download: 
Guide to Convert MKV videos for Oculus Cinema

Step 1: Add MKV clips 

Install and launch this best MKV Converter for Oculus Cinema; click "Add File" button to import the MKV files to the converter.


Step 2. Decide output format

Tap on "Select Format" bar and find "Format > Video", there are a lot of format options for you. "MP4", "MKV" or "MOV" is recommended for Oculus Cinema. Of course.

Step 3. Specify video/audio parameters

Click Settings button to adjust video/audio parameters like video resolution, bitrate, audio codec, audio channel. According to my experience, anything over 720p does nothing but turn battery energy into heat, due to the screen resolution. We also recommend using a higher bit rate than a typical web stream at that resolution, as the pixels in your video will be magnified on the phone's screen. The optimal bit rate is content dependent, and many videos can get by with less, but 5 Mb/s should give good quality. Remember to keep audio encoder to AAC or MP3.


Step 4. Add 3D Effect

Click "Edit" and turn to 3D, then choose "Left-Right" and click "OK" to set 3D mode for viewing MKV in Oculus Cinema with 3D effect.


Step 5. Start transcoding MKV to Oculus Cinema

Click the "Start" button at the bottom-right corner of the interface to convert the MKV file to Oculus Cinema compatible video files. This Video Converter will finish the conversion in just a few minutes. After the conversion, click "Open" icon to locate the converted video files. Now you can transfer the converted MKV videos to play with Oculus Cinema easily.

Step 6. Watch Your MKV Videos in Oculus Cinema

There are two ways to watch your own video content in the "My Videos" section of Oculus Cinema. First, any movies you record using your phone's camera will automatically appear in the "My Videos" section. The other way is to copy your compatible video files directly to your phone or SD card in any of the following directories:

On your phone's internal storage (Phone):

/DCIM/
/Movies/
/Oculus/Movies/

On your phone's removable SD card (Card):

/DCIM/
/Movies/
/Oculus/Movies/

On a PC, your phone's storage can be accessed from Windows Explorer by simply plugging in the USB data/charging cable - no software is required. On a Mac, files can be transferred to your phone using Android File Transfer (https://www.android.com/filetransfer/), which is a free utility provided by Google.

Free Download or Purchase Dimo Video Converter Ultimate:


Need the lifetime version to work on 2-4 PCs so that your friends and family can instantly broaden their entertainment options? Please refer to the family license here


Kindly Note:

The price of Dimo Video Converter Ultimate for Windows is divided into 1 Year Subscription, Lifetime/Family/Business License: $43.95/Year; $45.95/lifetime license; $95.95/family license(2-4 PCs); $189.95/business pack(5-8 PCs). Get your needed one at purchase page.

Related Software:

BDmate (Win/Mac)

Lossless backup Blu-ray to MKV with all audio and subtitle tracks; Rip Blu-ray to multi-track MP4; ConvertBlu-ray to almost all popular video/audio formats and devices; Copy Blu-ray to ISO/M2TS; Share digitized Blu-ray wirelessly.

DVDmate (Win/Mac)

A professional DVD ripping and editing tool with strong ability to remove DVD protection, transcode DVD to any video and audio format, and edit DVD to create personal movie.

Videomate (Win/Mac)

An all-around video converter software program that enables you to convert various video and audio files to formats that are supported by most multimedia devices.

8K Player (Win/Mac)

A mixture of free HD/4K video player, music player, Blu-ray/DVD player, video recorder and gif maker. 

Contact us or leave a message at Facebook if you have any issues.

Related Articles: